***
description: >-
Here, we'll walk you through the process of creating templates in the Dropbox
Sign web interface to use with the API.
'og:description': >-
Here, we'll walk you through the process of creating templates in the Dropbox
Sign web interface to use with the API.
---------------------------------------
# Using Templates with the API
Templates created on [HelloSign.com](https://app.hellosign.com/home/createReusableDocs) and [Embedded Templates](/docs/walkthroughs/embedded-templates) can be used for sending Signature Requests with the Dropbox Sign API. The API will allow you to interact with the template almost every way except editing.
Note: At the time of writing, templates created on HelloSign.com cannot be edited from the API. Similarly, templates created through Embedded Templates cannot be edited on HelloSign.com
## Template Setup
The following steps walk you through the process of creating a template using the Dropbox Sign web interface.
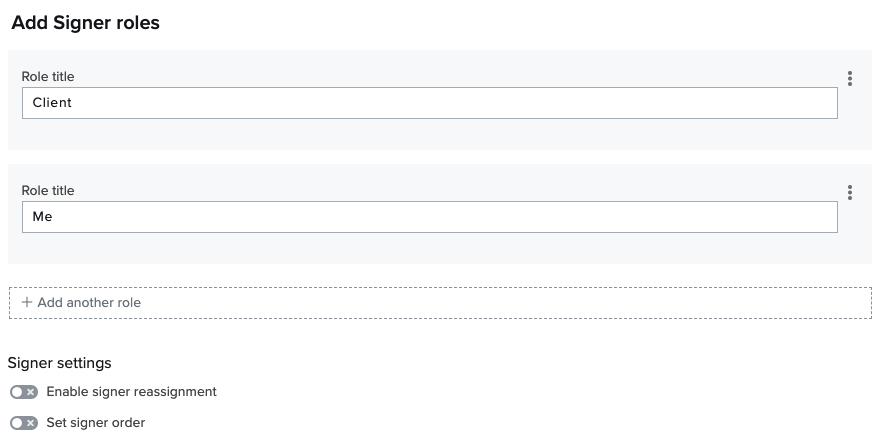
On HelloSign.com, [create a template](https://app.hellosign.com/home/createTemplate). Upload a document and specify the roles for each signer, for example 'Client' and 'Me'.
 Click **"Next"** and add fields to be filled out by each role by dragging them from the left sidebar down to the document.
 Add fields for any text or checkmark annotations you'll want to make at the time of sending.
Selecting **"Sender"** from the **"Signers"** menu will allow you to add Merge Fields (aka Custom Fields). Custom field data can be populated via API when the template is used in a signature request.
You must also specify a case-sensitive **"Merge field"** label that you will use to reference the custom field in your API request.
Add fields for any text or checkmark annotations you'll want to make at the time of sending.
Selecting **"Sender"** from the **"Signers"** menu will allow you to add Merge Fields (aka Custom Fields). Custom field data can be populated via API when the template is used in a signature request.
You must also specify a case-sensitive **"Merge field"** label that you will use to reference the custom field in your API request.
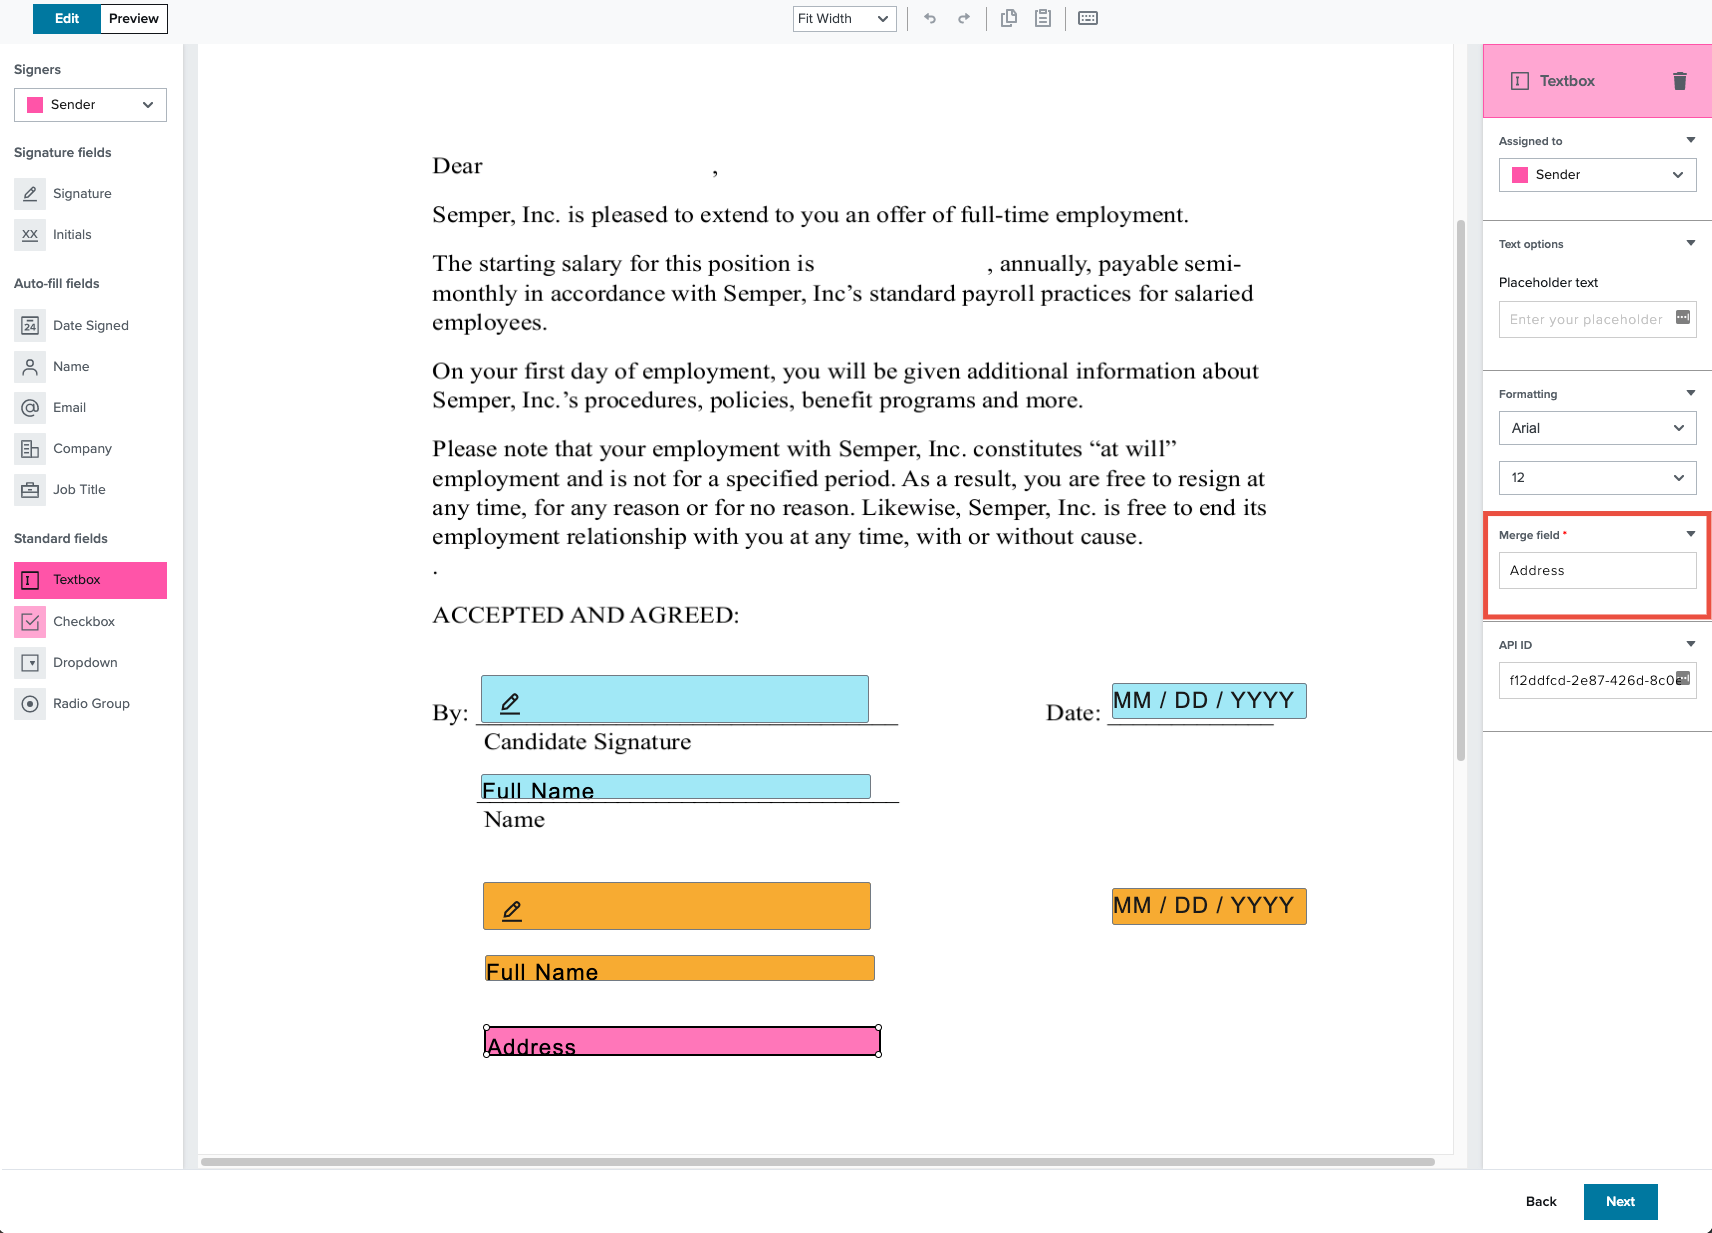 The "Merge field" label is case-sensitive but does not need to be unique, however, uniqueness is recommended to ensure accuracy when specifying the data that will be used to populate the signature request.
Click **"Next"** and add CC recepients, if applicable. Give your new Template a tittle and add an optional message.
The "Merge field" label is case-sensitive but does not need to be unique, however, uniqueness is recommended to ensure accuracy when specifying the data that will be used to populate the signature request.
Click **"Next"** and add CC recepients, if applicable. Give your new Template a tittle and add an optional message.
 ## Finding a Template ID
You will need to find a template's ID in order to be able to use it with the API.
### Finding a Template ID via HelloSign.com
Find the template on the account's [Templates](https://app.hellosign.com/home/createReusableDocs) page and select it. Click on **"More Information"** and select the **"Template ID"**.
### Finding a Template ID via the API
You can retrieve a paged list of your templates by making a GET call to [/template/list](/api/template/list). Iterate through this list -- requesting additional pages if necessary -- to find the template that has a matching title and/or `signer_roles`.
You can then retrieve the ID from this template object's `template_id` field.
{/*
```bash cURL
curl -X GET 'https://api.hellosign.com/v3/template/list?page=1&page_size=20' \
-u 'YOUR_API_KEY:'
```
```php PHP
setUsername("YOUR_API_KEY");
// $config->setAccessToken("YOUR_ACCESS_TOKEN");
try {
$response = (new Dropbox\Sign\Api\TemplateApi(config: $config))->templateList(
page: 1,
page_size: 20,
);
print_r($response);
} catch (Dropbox\Sign\ApiException $e) {
echo "Exception when calling TemplateApi#templateList: {$e->getMessage()}";
}
```
```csharp C#
setUsername("YOUR_API_KEY");
// $config->setAccessToken("YOUR_ACCESS_TOKEN");
try {
$response = (new Dropbox\Sign\Api\TemplateApi(config: $config))->templateList(
page: 1,
page_size: 20,
);
print_r($response);
} catch (Dropbox\Sign\ApiException $e) {
echo "Exception when calling TemplateApi#templateList: {$e->getMessage()}";
}
```
```ts TypeScript
import * as fs from 'fs';
import api from "@dropbox/sign"
import models from "@dropbox/sign"
const apiCaller = new api.TemplateApi();
apiCaller.username = "YOUR_API_KEY";
// apiCaller.accessToken = "YOUR_ACCESS_TOKEN";
apiCaller.templateList(
undefined, // accountId
1, // page
20, // pageSize
undefined, // query
).then(response => {
console.log(response.body);
}).catch(error => {
console.log("Exception when calling TemplateApi#templateList:");
console.log(error.body);
});
```
```java Java
package com.dropbox.sign_sandbox;
import com.dropbox.sign.ApiException;
import com.dropbox.sign.Configuration;
import com.dropbox.sign.api.*;
import com.dropbox.sign.auth.*;
import com.dropbox.sign.JSON;
import com.dropbox.sign.model.*;
import java.io.File;
import java.math.BigDecimal;
import java.time.LocalDate;
import java.time.OffsetDateTime;
import java.util.ArrayList;
import java.util.List;
import java.util.Map;
public class TemplateListExample
{
public static void main(String[] args)
{
var config = Configuration.getDefaultApiClient();
((HttpBasicAuth) config.getAuthentication("api_key")).setUsername("YOUR_API_KEY");
// ((HttpBearerAuth) config.getAuthentication("oauth2")).setBearerToken("YOUR_ACCESS_TOKEN");
try
{
var response = new TemplateApi(config).templateList(
null, // accountId
1, // page
20, // pageSize
null // query
);
System.out.println(response);
} catch (ApiException e) {
System.err.println("Exception when calling TemplateApi#templateList");
System.err.println("Status code: " + e.getCode());
System.err.println("Reason: " + e.getResponseBody());
System.err.println("Response headers: " + e.getResponseHeaders());
e.printStackTrace();
}
}
}
```
```ruby Ruby
require "json"
require "dropbox-sign"
Dropbox::Sign.configure do |config|
config.username = "YOUR_API_KEY"
# config.access_token = "YOUR_ACCESS_TOKEN"
end
begin
response = Dropbox::Sign::TemplateApi.new.template_list(
{
account_id: nil,
page: 1,
page_size: 20,
query: nil,
},
)
p response
rescue Dropbox::Sign::ApiError => e
puts "Exception when calling TemplateApi#template_list: #{e}"
end
```
```python Python
import json
from datetime import date, datetime
from pprint import pprint
from dropbox_sign import ApiClient, ApiException, Configuration, api, models
configuration = Configuration(
username="YOUR_API_KEY",
# access_token="YOUR_ACCESS_TOKEN",
)
with ApiClient(configuration) as api_client:
try:
response = api.TemplateApi(api_client).template_list(
page=1,
page_size=20,
)
pprint(response)
except ApiException as e:
print("Exception when calling TemplateApi#template_list: %s\n" % e)
```
*/}
## Using a Template to Send a Request
You can send a signature request based on a template in your account by making a POST request to [/signature\_request/send\_with\_template](/api/signature-request/send-with-template) and including the `template_id` parameter. You will also be required to provide a unique signer name and email address for each signer role defined in the template.
Locked templates can be used in test mode using the boolean parameter
## Finding a Template ID
You will need to find a template's ID in order to be able to use it with the API.
### Finding a Template ID via HelloSign.com
Find the template on the account's [Templates](https://app.hellosign.com/home/createReusableDocs) page and select it. Click on **"More Information"** and select the **"Template ID"**.
### Finding a Template ID via the API
You can retrieve a paged list of your templates by making a GET call to [/template/list](/api/template/list). Iterate through this list -- requesting additional pages if necessary -- to find the template that has a matching title and/or `signer_roles`.
You can then retrieve the ID from this template object's `template_id` field.
{/*
```bash cURL
curl -X GET 'https://api.hellosign.com/v3/template/list?page=1&page_size=20' \
-u 'YOUR_API_KEY:'
```
```php PHP
setUsername("YOUR_API_KEY");
// $config->setAccessToken("YOUR_ACCESS_TOKEN");
try {
$response = (new Dropbox\Sign\Api\TemplateApi(config: $config))->templateList(
page: 1,
page_size: 20,
);
print_r($response);
} catch (Dropbox\Sign\ApiException $e) {
echo "Exception when calling TemplateApi#templateList: {$e->getMessage()}";
}
```
```csharp C#
setUsername("YOUR_API_KEY");
// $config->setAccessToken("YOUR_ACCESS_TOKEN");
try {
$response = (new Dropbox\Sign\Api\TemplateApi(config: $config))->templateList(
page: 1,
page_size: 20,
);
print_r($response);
} catch (Dropbox\Sign\ApiException $e) {
echo "Exception when calling TemplateApi#templateList: {$e->getMessage()}";
}
```
```ts TypeScript
import * as fs from 'fs';
import api from "@dropbox/sign"
import models from "@dropbox/sign"
const apiCaller = new api.TemplateApi();
apiCaller.username = "YOUR_API_KEY";
// apiCaller.accessToken = "YOUR_ACCESS_TOKEN";
apiCaller.templateList(
undefined, // accountId
1, // page
20, // pageSize
undefined, // query
).then(response => {
console.log(response.body);
}).catch(error => {
console.log("Exception when calling TemplateApi#templateList:");
console.log(error.body);
});
```
```java Java
package com.dropbox.sign_sandbox;
import com.dropbox.sign.ApiException;
import com.dropbox.sign.Configuration;
import com.dropbox.sign.api.*;
import com.dropbox.sign.auth.*;
import com.dropbox.sign.JSON;
import com.dropbox.sign.model.*;
import java.io.File;
import java.math.BigDecimal;
import java.time.LocalDate;
import java.time.OffsetDateTime;
import java.util.ArrayList;
import java.util.List;
import java.util.Map;
public class TemplateListExample
{
public static void main(String[] args)
{
var config = Configuration.getDefaultApiClient();
((HttpBasicAuth) config.getAuthentication("api_key")).setUsername("YOUR_API_KEY");
// ((HttpBearerAuth) config.getAuthentication("oauth2")).setBearerToken("YOUR_ACCESS_TOKEN");
try
{
var response = new TemplateApi(config).templateList(
null, // accountId
1, // page
20, // pageSize
null // query
);
System.out.println(response);
} catch (ApiException e) {
System.err.println("Exception when calling TemplateApi#templateList");
System.err.println("Status code: " + e.getCode());
System.err.println("Reason: " + e.getResponseBody());
System.err.println("Response headers: " + e.getResponseHeaders());
e.printStackTrace();
}
}
}
```
```ruby Ruby
require "json"
require "dropbox-sign"
Dropbox::Sign.configure do |config|
config.username = "YOUR_API_KEY"
# config.access_token = "YOUR_ACCESS_TOKEN"
end
begin
response = Dropbox::Sign::TemplateApi.new.template_list(
{
account_id: nil,
page: 1,
page_size: 20,
query: nil,
},
)
p response
rescue Dropbox::Sign::ApiError => e
puts "Exception when calling TemplateApi#template_list: #{e}"
end
```
```python Python
import json
from datetime import date, datetime
from pprint import pprint
from dropbox_sign import ApiClient, ApiException, Configuration, api, models
configuration = Configuration(
username="YOUR_API_KEY",
# access_token="YOUR_ACCESS_TOKEN",
)
with ApiClient(configuration) as api_client:
try:
response = api.TemplateApi(api_client).template_list(
page=1,
page_size=20,
)
pprint(response)
except ApiException as e:
print("Exception when calling TemplateApi#template_list: %s\n" % e)
```
*/}
## Using a Template to Send a Request
You can send a signature request based on a template in your account by making a POST request to [/signature\_request/send\_with\_template](/api/signature-request/send-with-template) and including the `template_id` parameter. You will also be required to provide a unique signer name and email address for each signer role defined in the template.
Locked templates can be used in test mode using the boolean parameter test\_mode.
```json title="Default Example"
{
"template_ids": [
"5eb54aaaa71ce8dcaec5d06e93a2754af1712606",
"35e3787bd2e61e496099afe44e2767f076378c12",
"24084dc86475a088b39a49e6fb0fc33006882695"
],
"subject": "Purchase Order",
"message": "Glad we could come to an agreement.",
"signers": [
{
"role": "Client",
"name": "George",
"email_address": "george@example.com"
}
],
"ccs": [
{
"role": "Accounting",
"email_address": "accounting@example.com"
}
],
"custom_fields": [
{
"name": "Cost",
"value": "$20,000",
"editor": "Client",
"required": true
}
],
"signing_options": {
"draw": true,
"type": true,
"upload": true,
"phone": false,
"default_type": "draw"
},
"test_mode": true
}
```
{/*
```bash cURL
curl -X POST 'https://api.hellosign.com/v3/signature_request/send_with_template' \
-u 'YOUR_API_KEY:' \
-F 'client_id=YOUR_CLIENT_ID' \
-F 'template_ids[]=61a832ff0d8423f91d503e76bfbcc750f7417c78' \
-F 'subject=Purchase Order' \
-F 'message=Glad we could come to an agreement.' \
-F 'signers[0][role]=Client' \
-F 'signers[0][name]=George' \
-F 'signers[0][email_address]=george@example.com' \
-F 'ccs[0][role]=Accounting' \
-F 'ccs[0][email_address]=accounting@example.com' \
-F 'custom_fields[0][name]=Cost' \
-F 'custom_fields[0][value]=$20,000' \
-F 'custom_fields[0][editor]=Client' \
-F 'custom_fields[0][required]=true' \
-F 'signing_options[draw]=1' \
-F 'signing_options[type]=1' \
-F 'signing_options[upload]=1' \
-F 'signing_options[phone]=1' \
-F 'signing_options[default_type]=draw' \
-F 'test_mode=1'
```
```php PHP
setUsername("YOUR_API_KEY");
// $config->setAccessToken("YOUR_ACCESS_TOKEN");
$signing_options = (new Dropbox\Sign\Model\SubSigningOptions())
->setDefaultType(Dropbox\Sign\Model\SubSigningOptions::DEFAULT_TYPE_DRAW)
->setDraw(true)
->setPhone(false)
->setType(true)
->setUpload(true);
$signers_1 = (new Dropbox\Sign\Model\SubSignatureRequestTemplateSigner())
->setRole("Client")
->setName("George")
->setEmailAddress("george@example.com");
$signers = [
$signers_1,
];
$ccs_1 = (new Dropbox\Sign\Model\SubCC())
->setRole("Accounting")
->setEmailAddress("accounting@example.com");
$ccs = [
$ccs_1,
];
$custom_fields_1 = (new Dropbox\Sign\Model\SubCustomField())
->setName("Cost")
->setEditor("Client")
->setRequired(true)
->setValue("\$20,000");
$custom_fields = [
$custom_fields_1,
];
$signature_request_send_with_template_request = (new Dropbox\Sign\Model\SignatureRequestSendWithTemplateRequest())
->setTemplateIds([
"61a832ff0d8423f91d503e76bfbcc750f7417c78",
])
->setMessage("Glad we could come to an agreement.")
->setSubject("Purchase Order")
->setTestMode(true)
->setSigningOptions($signing_options)
->setSigners($signers)
->setCcs($ccs)
->setCustomFields($custom_fields);
try {
$response = (new Dropbox\Sign\Api\SignatureRequestApi(config: $config))->signatureRequestSendWithTemplate(
signature_request_send_with_template_request: $signature_request_send_with_template_request,
);
print_r($response);
} catch (Dropbox\Sign\ApiException $e) {
echo "Exception when calling SignatureRequestApi#signatureRequestSendWithTemplate: {$e->getMessage()}";
}
```
```csharp C#
using System;
using System.Collections.Generic;
using System.IO;
using System.Text.Json;
using Dropbox.Sign.Api;
using Dropbox.Sign.Client;
using Dropbox.Sign.Model;
namespace Dropbox.SignSandbox;
public class SignatureRequestSendWithTemplateExample
{
public static void Run()
{
var config = new Configuration();
config.Username = "YOUR_API_KEY";
// config.AccessToken = "YOUR_ACCESS_TOKEN";
var signingOptions = new SubSigningOptions(
defaultType: SubSigningOptions.DefaultTypeEnum.Draw,
draw: true,
phone: false,
type: true,
upload: true
);
var signers1 = new SubSignatureRequestTemplateSigner(
role: "Client",
name: "George",
emailAddress: "george@example.com"
);
var signers = new List
{
signers1,
};
var ccs1 = new SubCC(
role: "Accounting",
emailAddress: "accounting@example.com"
);
var ccs = new List
{
ccs1,
};
var customFields1 = new SubCustomField(
name: "Cost",
editor: "Client",
required: true,
value: "$20,000"
);
var customFields = new List
{
customFields1,
};
var signatureRequestSendWithTemplateRequest = new SignatureRequestSendWithTemplateRequest(
templateIds: [
"61a832ff0d8423f91d503e76bfbcc750f7417c78",
],
message: "Glad we could come to an agreement.",
subject: "Purchase Order",
testMode: true,
signingOptions: signingOptions,
signers: signers,
ccs: ccs,
customFields: customFields
);
try
{
var response = new SignatureRequestApi(config).SignatureRequestSendWithTemplate(
signatureRequestSendWithTemplateRequest: signatureRequestSendWithTemplateRequest
);
Console.WriteLine(response);
}
catch (ApiException e)
{
Console.WriteLine("Exception when calling SignatureRequestApi#SignatureRequestSendWithTemplate: " + e.Message);
Console.WriteLine("Status Code: " + e.ErrorCode);
Console.WriteLine(e.StackTrace);
}
}
}
```
```ts TypeScript
import * as fs from 'fs';
import api from "@dropbox/sign"
import models from "@dropbox/sign"
const apiCaller = new api.SignatureRequestApi();
apiCaller.username = "YOUR_API_KEY";
// apiCaller.accessToken = "YOUR_ACCESS_TOKEN";
const signingOptions: models.SubSigningOptions = {
defaultType: models.SubSigningOptions.DefaultTypeEnum.Draw,
draw: true,
phone: false,
type: true,
upload: true,
};
const signers1: models.SubSignatureRequestTemplateSigner = {
role: "Client",
name: "George",
emailAddress: "george@example.com",
};
const signers = [
signers1,
];
const ccs1: models.SubCC = {
role: "Accounting",
emailAddress: "accounting@example.com",
};
const ccs = [
ccs1,
];
const customFields1: models.SubCustomField = {
name: "Cost",
editor: "Client",
required: true,
value: "$20,000",
};
const customFields = [
customFields1,
];
const signatureRequestSendWithTemplateRequest: models.SignatureRequestSendWithTemplateRequest = {
templateIds: [
"61a832ff0d8423f91d503e76bfbcc750f7417c78",
],
message: "Glad we could come to an agreement.",
subject: "Purchase Order",
testMode: true,
signingOptions: signingOptions,
signers: signers,
ccs: ccs,
customFields: customFields,
};
apiCaller.signatureRequestSendWithTemplate(
signatureRequestSendWithTemplateRequest,
).then(response => {
console.log(response.body);
}).catch(error => {
console.log("Exception when calling SignatureRequestApi#signatureRequestSendWithTemplate:");
console.log(error.body);
});
```
```java Java
package com.dropbox.sign_sandbox;
import com.dropbox.sign.ApiException;
import com.dropbox.sign.Configuration;
import com.dropbox.sign.api.*;
import com.dropbox.sign.auth.*;
import com.dropbox.sign.JSON;
import com.dropbox.sign.model.*;
import java.io.File;
import java.math.BigDecimal;
import java.time.LocalDate;
import java.time.OffsetDateTime;
import java.util.ArrayList;
import java.util.List;
import java.util.Map;
public class SignatureRequestSendWithTemplateExample
{
public static void main(String[] args)
{
var config = Configuration.getDefaultApiClient();
((HttpBasicAuth) config.getAuthentication("api_key")).setUsername("YOUR_API_KEY");
// ((HttpBearerAuth) config.getAuthentication("oauth2")).setBearerToken("YOUR_ACCESS_TOKEN");
var signingOptions = new SubSigningOptions();
signingOptions.defaultType(SubSigningOptions.DefaultTypeEnum.DRAW);
signingOptions.draw(true);
signingOptions.phone(false);
signingOptions.type(true);
signingOptions.upload(true);
var signers1 = new SubSignatureRequestTemplateSigner();
signers1.role("Client");
signers1.name("George");
signers1.emailAddress("george@example.com");
var signers = new ArrayList(List.of (
signers1
));
var ccs1 = new SubCC();
ccs1.role("Accounting");
ccs1.emailAddress("accounting@example.com");
var ccs = new ArrayList(List.of (
ccs1
));
var customFields1 = new SubCustomField();
customFields1.name("Cost");
customFields1.editor("Client");
customFields1.required(true);
customFields1.value("$20,000");
var customFields = new ArrayList(List.of (
customFields1
));
var signatureRequestSendWithTemplateRequest = new SignatureRequestSendWithTemplateRequest();
signatureRequestSendWithTemplateRequest.templateIds(List.of (
"61a832ff0d8423f91d503e76bfbcc750f7417c78"
));
signatureRequestSendWithTemplateRequest.message("Glad we could come to an agreement.");
signatureRequestSendWithTemplateRequest.subject("Purchase Order");
signatureRequestSendWithTemplateRequest.testMode(true);
signatureRequestSendWithTemplateRequest.signingOptions(signingOptions);
signatureRequestSendWithTemplateRequest.signers(signers);
signatureRequestSendWithTemplateRequest.ccs(ccs);
signatureRequestSendWithTemplateRequest.customFields(customFields);
try
{
var response = new SignatureRequestApi(config).signatureRequestSendWithTemplate(
signatureRequestSendWithTemplateRequest
);
System.out.println(response);
} catch (ApiException e) {
System.err.println("Exception when calling SignatureRequestApi#signatureRequestSendWithTemplate");
System.err.println("Status code: " + e.getCode());
System.err.println("Reason: " + e.getResponseBody());
System.err.println("Response headers: " + e.getResponseHeaders());
e.printStackTrace();
}
}
}
```
```ruby Ruby
require "json"
require "dropbox-sign"
Dropbox::Sign.configure do |config|
config.username = "YOUR_API_KEY"
# config.access_token = "YOUR_ACCESS_TOKEN"
end
signing_options = Dropbox::Sign::SubSigningOptions.new
signing_options.default_type = "draw"
signing_options.draw = true
signing_options.phone = false
signing_options.type = true
signing_options.upload = true
signers_1 = Dropbox::Sign::SubSignatureRequestTemplateSigner.new
signers_1.role = "Client"
signers_1.name = "George"
signers_1.email_address = "george@example.com"
signers = [
signers_1,
]
ccs_1 = Dropbox::Sign::SubCC.new
ccs_1.role = "Accounting"
ccs_1.email_address = "accounting@example.com"
ccs = [
ccs_1,
]
custom_fields_1 = Dropbox::Sign::SubCustomField.new
custom_fields_1.name = "Cost"
custom_fields_1.editor = "Client"
custom_fields_1.required = true
custom_fields_1.value = "$20,000"
custom_fields = [
custom_fields_1,
]
signature_request_send_with_template_request = Dropbox::Sign::SignatureRequestSendWithTemplateRequest.new
signature_request_send_with_template_request.template_ids = [
"61a832ff0d8423f91d503e76bfbcc750f7417c78",
]
signature_request_send_with_template_request.message = "Glad we could come to an agreement."
signature_request_send_with_template_request.subject = "Purchase Order"
signature_request_send_with_template_request.test_mode = true
signature_request_send_with_template_request.signing_options = signing_options
signature_request_send_with_template_request.signers = signers
signature_request_send_with_template_request.ccs = ccs
signature_request_send_with_template_request.custom_fields = custom_fields
begin
response = Dropbox::Sign::SignatureRequestApi.new.signature_request_send_with_template(
signature_request_send_with_template_request,
)
p response
rescue Dropbox::Sign::ApiError => e
puts "Exception when calling SignatureRequestApi#signature_request_send_with_template: #{e}"
end
```
```python Python
import json
from datetime import date, datetime
from pprint import pprint
from dropbox_sign import ApiClient, ApiException, Configuration, api, models
configuration = Configuration(
username="YOUR_API_KEY",
# access_token="YOUR_ACCESS_TOKEN",
)
with ApiClient(configuration) as api_client:
signing_options = models.SubSigningOptions(
default_type="draw",
draw=True,
phone=False,
type=True,
upload=True,
)
signers_1 = models.SubSignatureRequestTemplateSigner(
role="Client",
name="George",
email_address="george@example.com",
)
signers = [
signers_1,
]
ccs_1 = models.SubCC(
role="Accounting",
email_address="accounting@example.com",
)
ccs = [
ccs_1,
]
custom_fields_1 = models.SubCustomField(
name="Cost",
editor="Client",
required=True,
value="$20,000",
)
custom_fields = [
custom_fields_1,
]
signature_request_send_with_template_request = models.SignatureRequestSendWithTemplateRequest(
template_ids=[
"61a832ff0d8423f91d503e76bfbcc750f7417c78",
],
message="Glad we could come to an agreement.",
subject="Purchase Order",
test_mode=True,
signing_options=signing_options,
signers=signers,
ccs=ccs,
custom_fields=custom_fields,
)
try:
response = api.SignatureRequestApi(api_client).signature_request_send_with_template(
signature_request_send_with_template_request=signature_request_send_with_template_request,
)
pprint(response)
except ApiException as e:
print("Exception when calling SignatureRequestApi#signature_request_send_with_template: %s\n" % e)
```
*/}
## Using Multiple Templates in a Request
You can send a signature request based on multiple templates in your account by making a POST request to [/signature\_request/send\_with\_template](/api/signature-request/send-with-template) and including the necessary `template_ids[%i%]` parameters. You will be required to provide a unique signer name and email address for each signer role in each template.
**Note:** When sending a request with multipe templates, no more than one template with ordered signers can be used.
## Using Long Text in Custom Fields
The text for a custom field should fit into the space available. If it does not fit it will overrun the box and a warning will be thrown. Additionally, if the signer is assigned [editor privileges to the custom field](https://faq.hellosign.com/hc/en-us/articles/216599897?_ga=2.201339985.1130402992.1658331385-1952918733.1658331385) and the text overruns the border, an error will be thrown.
The exact length of text that will fit in any given field depends on the nature of that text. If the text uses wide fonts, or uses words that are long and do not wrap efficiently, less text will fit. If the font is small and narrow, more text will fit.
To help you choose an appropriate text length, some guidance is provided in the response object when calling [/template/list](/api/template/list) or [/template/\{template\_id}](/api/template/get). The response object contains an `avg_text_length` object, per custom field. This object contains two properties (`num_lines` and `num_chars_per_line`) whose values are the expected number of lines and expected number of characters per line, respectively.
If the expected number of characters is exceeded a warning message will be thrown, this warning will contain the `avg_text_length` object once again.
There may be some instances where a warning message will still be thrown even when the text length is less than the expected value. Typically, this is due to the usage of unusually wide fonts, or words that wrap inefficiently into the available space on the field.